Configuration Guide
The configuration page is used to manage system settings, reference data and manage administrative options. Its also used to control specific fields of data.
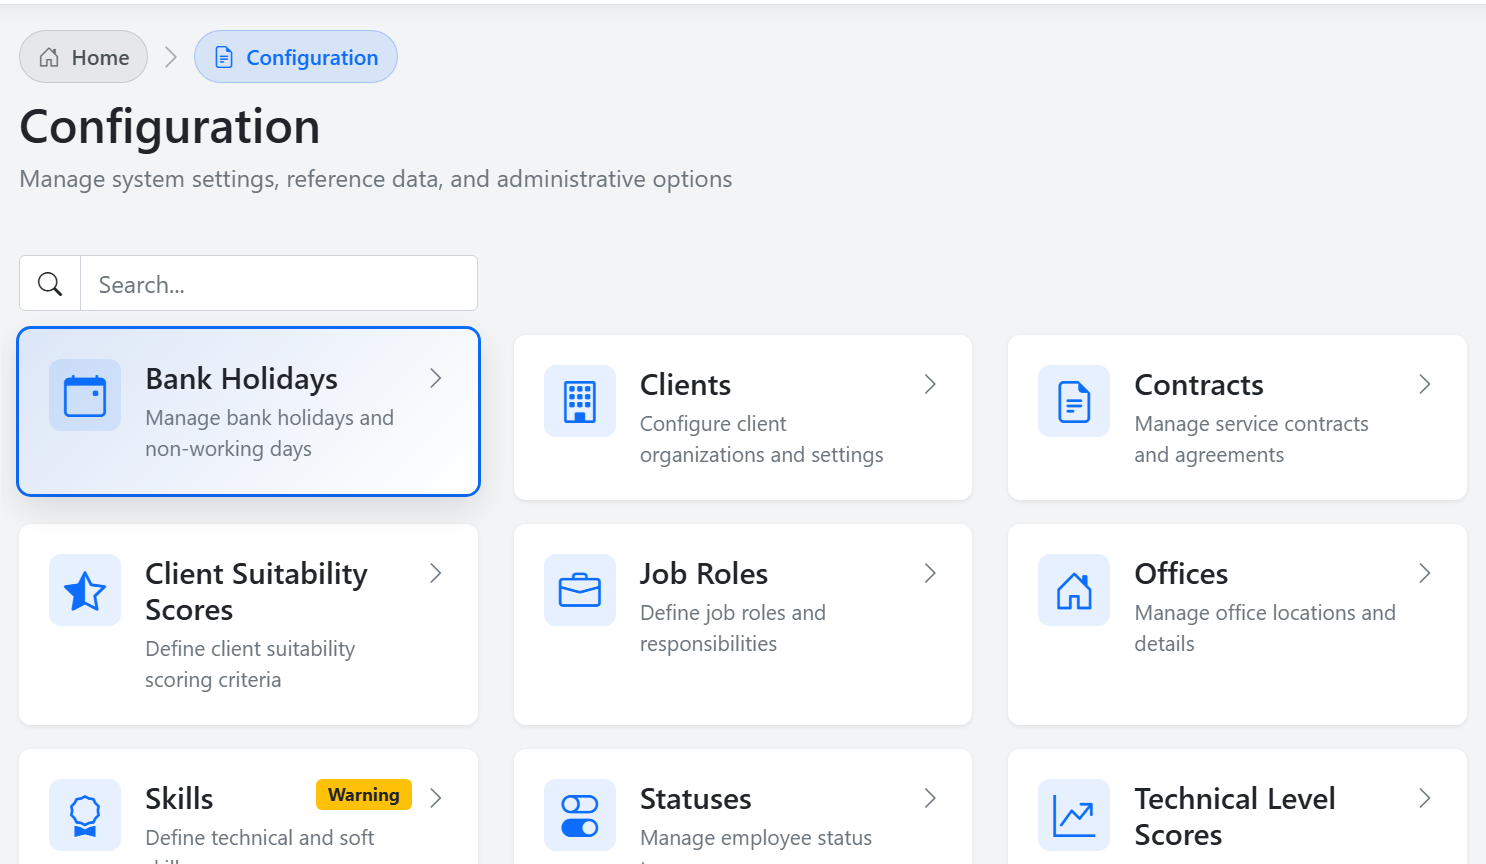 Screenshot: Configuration page in ZZ Portal
-
Direct Link - Configuration Page
Clients Section
The clients section holds the clients data which includes contact types, azure tenant config and onboarding status. This section can also be used to onboard or add new clients.
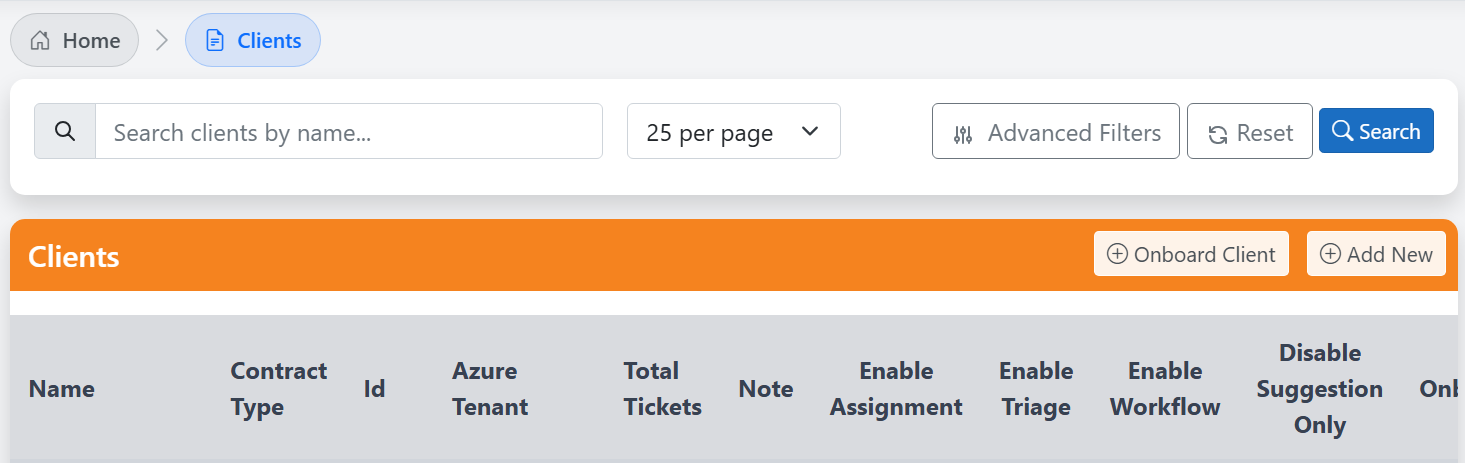 Screenshot: Client page
-
Direct Link - Clients Section
Onboarding A Client
-
First you have to identify the name of the company, you can also search by ConnectWise companies
-
The next step is to add them to their new pod and contract
-
You can then select what feature flags you would like to enable, these include:
- Automatic Triage: Auto categorise and prioritise incoming tickets using AI analysis
- Automatic Assignment: Auto assign tickets to the best suited available employee
- Direct Assignment: Allow direct ticket assignmnet instead of suggestion only mode
- Workflows: Enable automated multi-step workflows for the clients tickets
- Customer Forms: Allow customer facing form submissions and intake workflows
-
After this you will be taken to the team mapping and external link step, here you will pick the best suited team/employees for the clients tickets. The external links that can be added are the Azure Tenant ID and IT Glue Organisation ID
-
You can then review all the information you have entered and then click the "Onboard Client" button
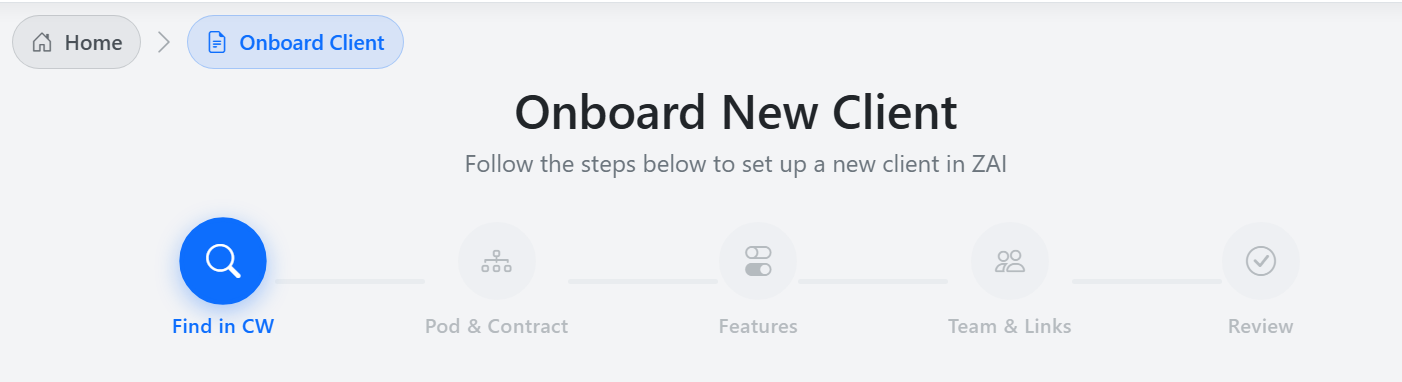 Screenshot: Onboard new client steps
-
Direct Link - Onboarding A New Client
Add New Client
- You will need to fill out a form to preform this action, you will need to have the clients details as well as ids,
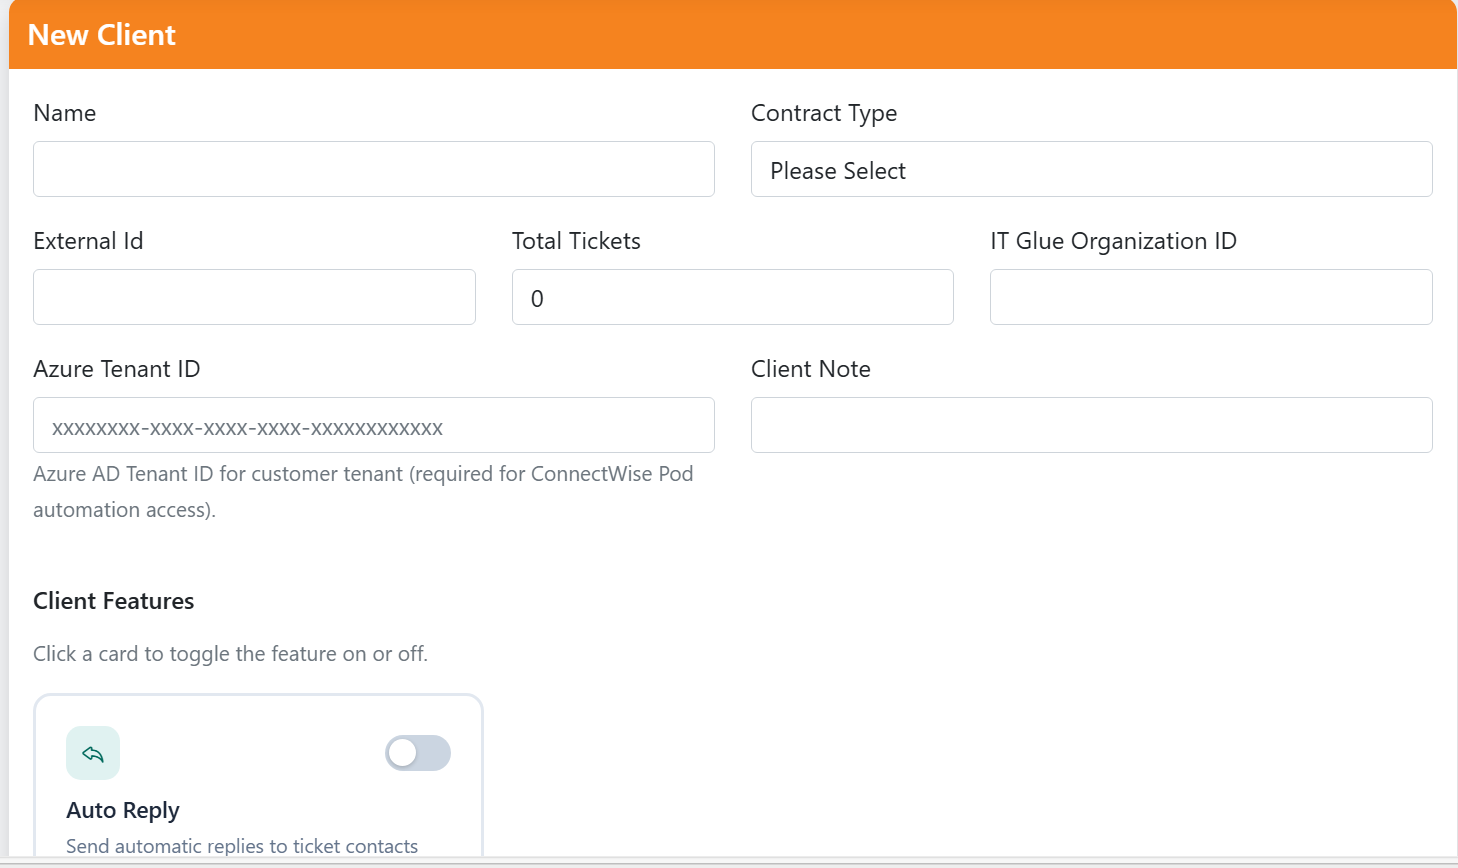 Screenshot: Add New Client Form
-
Direct Link - Adding A New Client
Scores
Technical Level Scores
Technical level is based on the triage process. It determines based on the prompt what level the ticket is, this will be Level 1, 2 or 3. Then when searching through the list of technicians, it will weight the scoring depending on if their technical level matches. If it matches the score bumps up, if it's higher than their level it bumps them down and if their higher it bumps them down a bit but they can still be assigned the ticket if none of the levels are available.
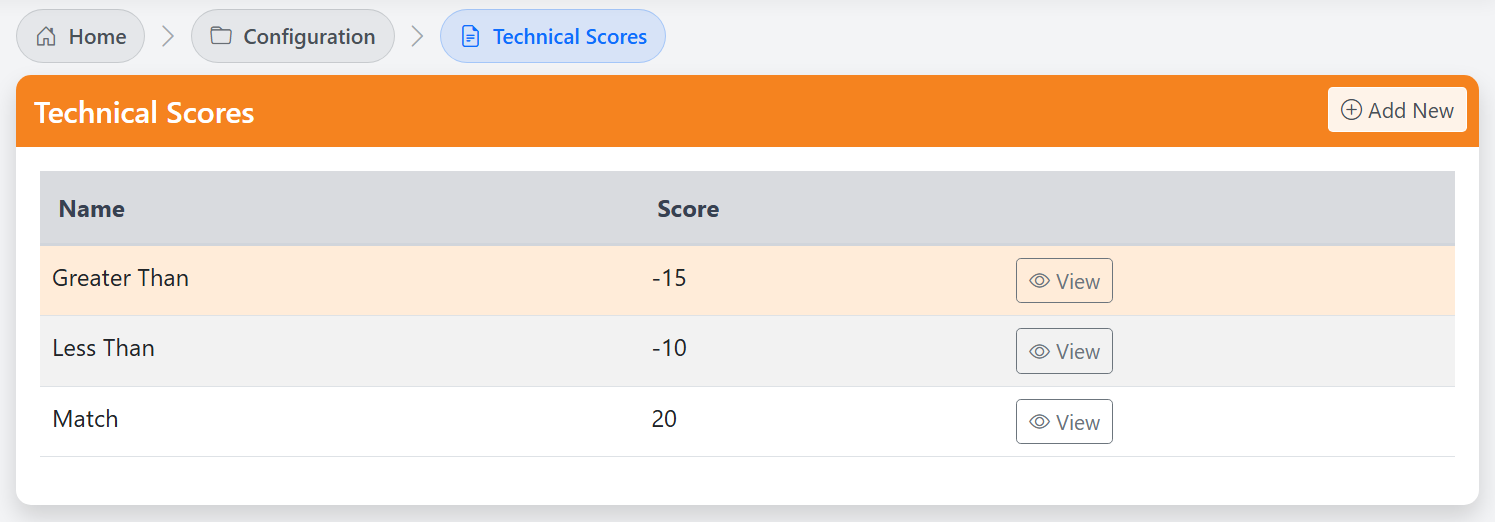 Screenshot: Technical level calculations
-
Direct Link - Technical Level Score Section
Workload Scores
Workload score is based off of ticket assignment score and then booked time, from here we can book in client appointments etc
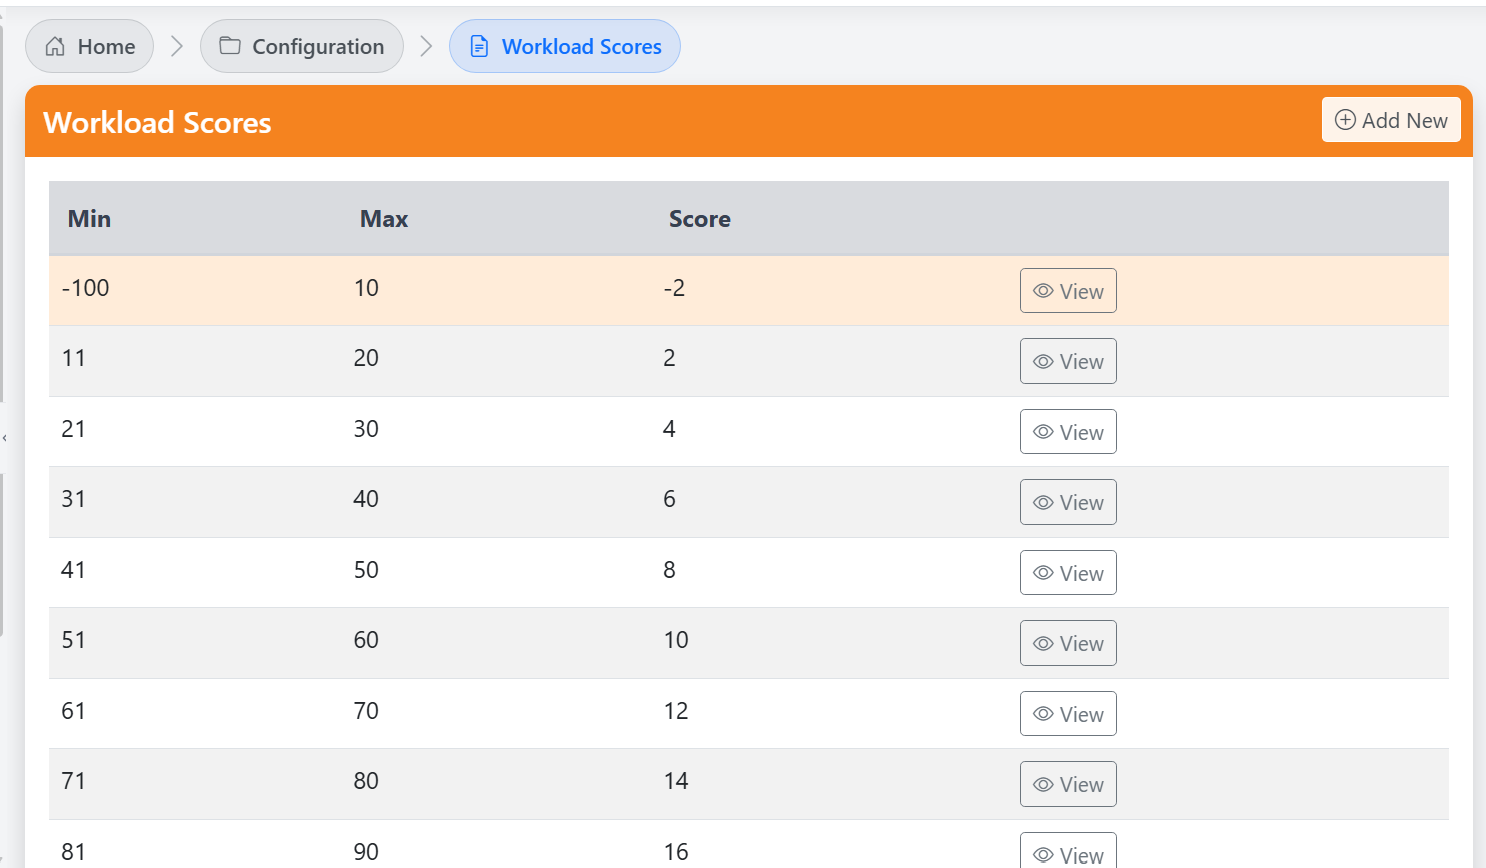 Screenshot: Workload Calculation
-
Direct Link - Workload Scores Section
Availability Scores
The availability score is used to calculate the work load of the technicians. This determines how much time the tech has and gives them a score based on this.
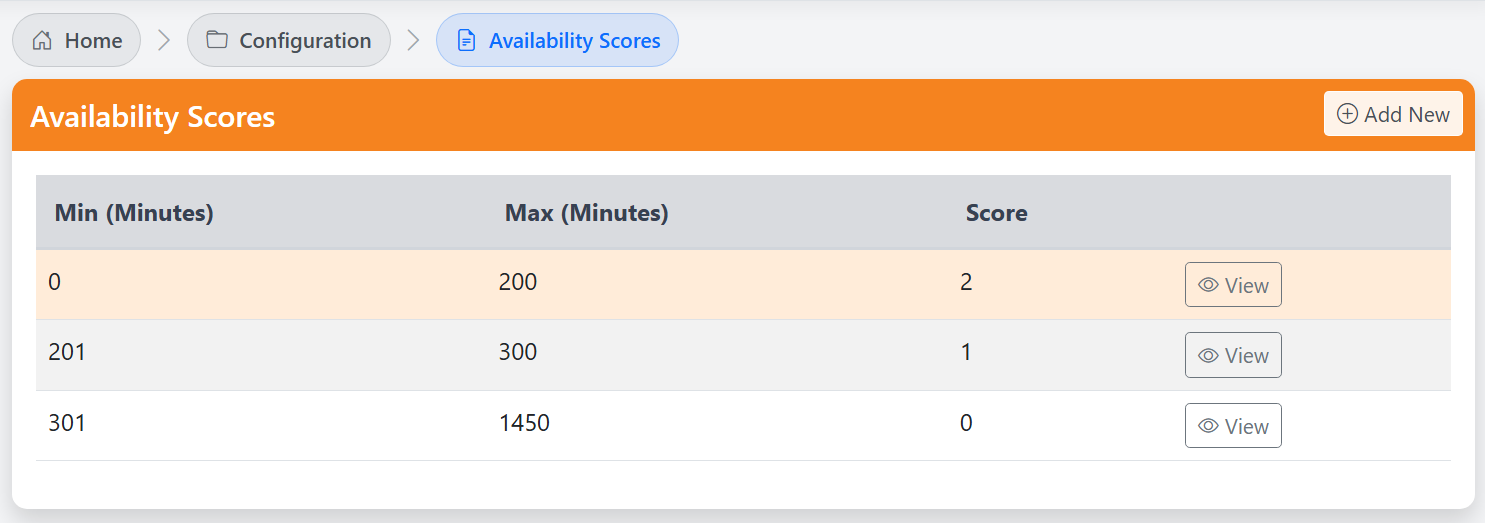 Screenshot: Availability Calculations
-
Direct Link - Availability Scores Section
Assignment Window Scores
Assignment Window Score is in place to prevent the technicians from being overwhelmed with tickets. When a ticket is assigned, it updates the last assigned field and then this is checked and based on the weighting in the config, it then will bump them down by a certain amount.
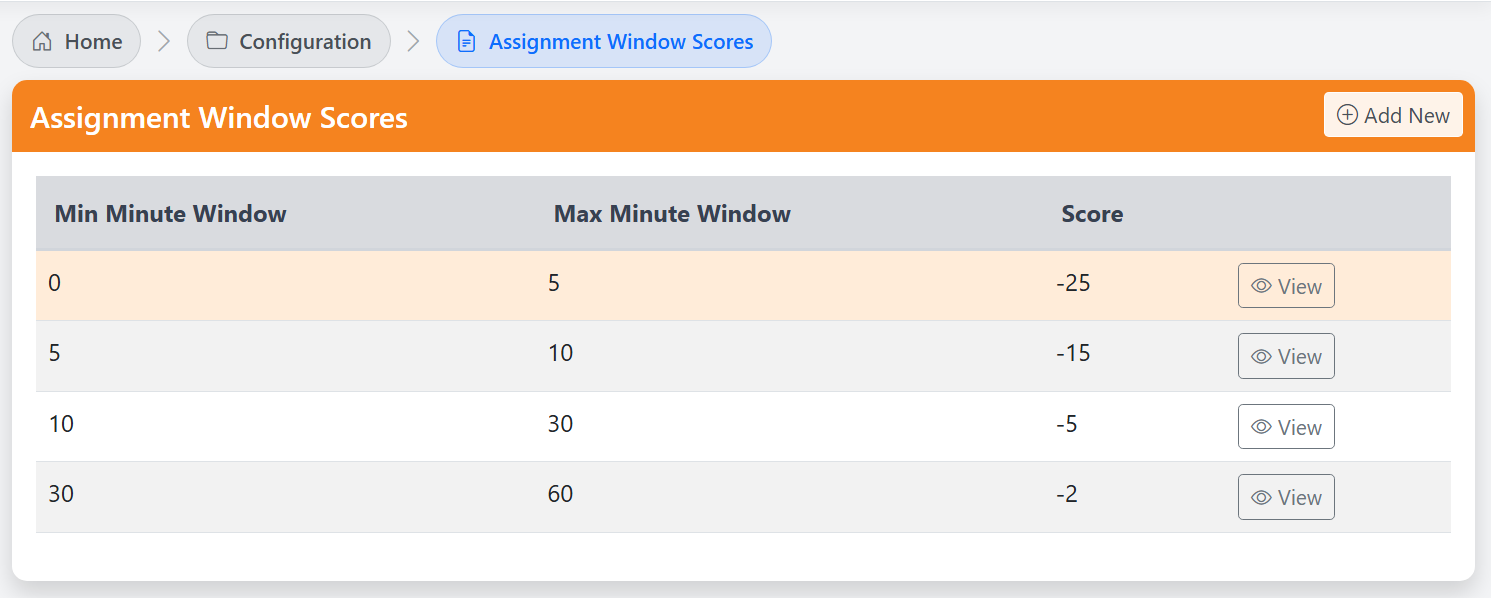 Screenshot: Assignment window calculations
-
Direct Link - Assignment Window Scores Section
Skills
This section is going to be used to help triage tickets effeciently. It will use employees soft and technical skills and assign the tickets to the best suited tech. These skills will be determind from ticket closures. For example if a user has closed multiple performance tickets, then they will have that skill put against their name. This will then be used when triaging tickets to allow for more effecient ticket closure.
-
Direct Link - Skills Section
Configurations
Board Pod Configurations
Board pod configuration is used to show the ConnectWise ticket queues for each pod.
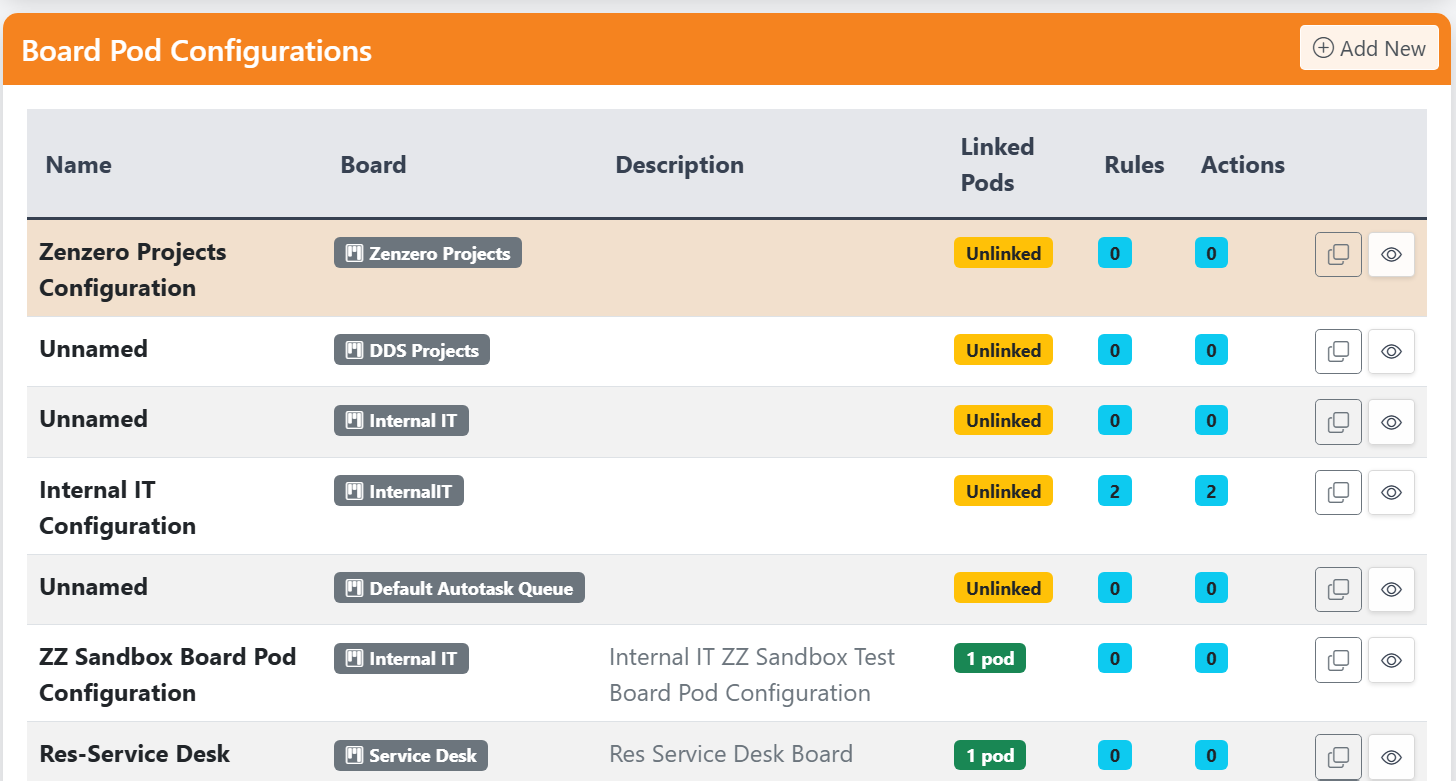 Screenshot: Board Pod Configuration
-
Direct Link - Board Pod Configurations Section
Field Configurations
Field configuration is the mapping of the fields between ZAI and the connectwise instance it's linked to.
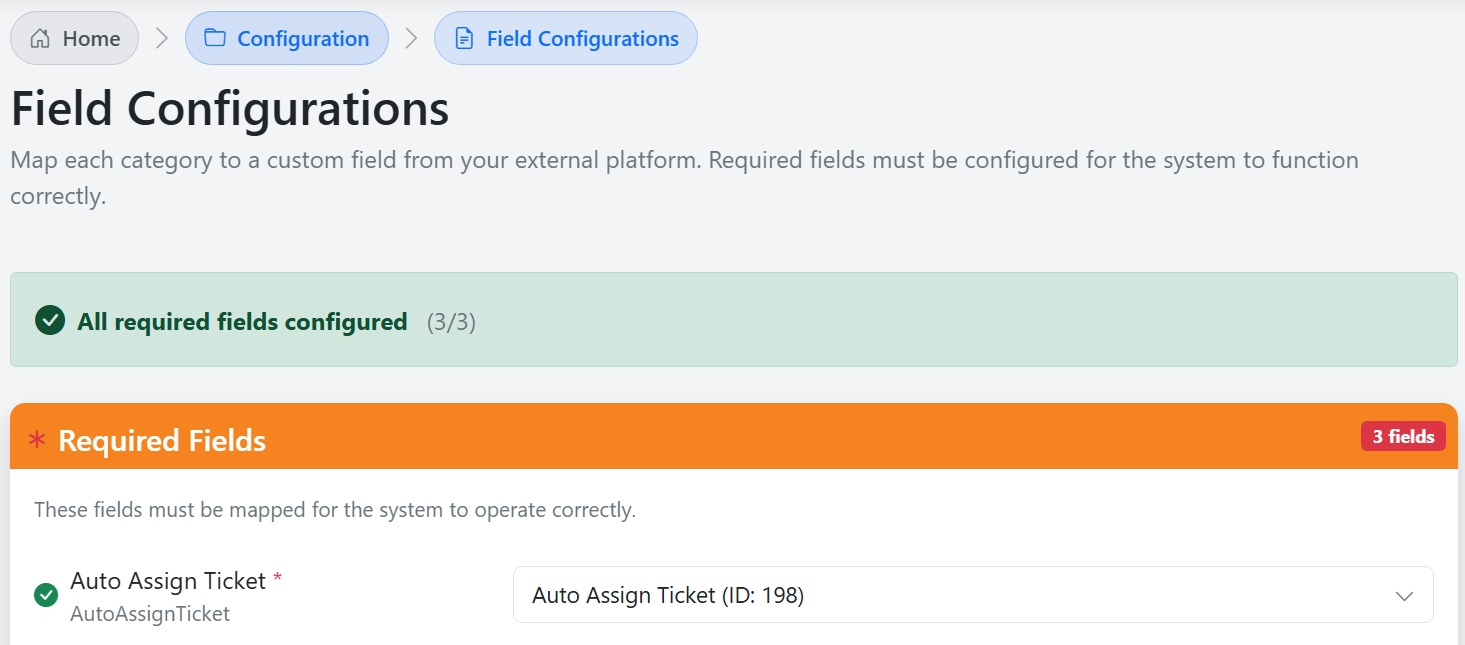 Screenshot: Field configurations
-
Direct Link - Field Configurations Section
Triage Configurations
Triage Configuration allows you to personalize your pods auto triaged tickets. There is a lot inside of this sections which can come across as confusing when in reality its not as bad as it seems.
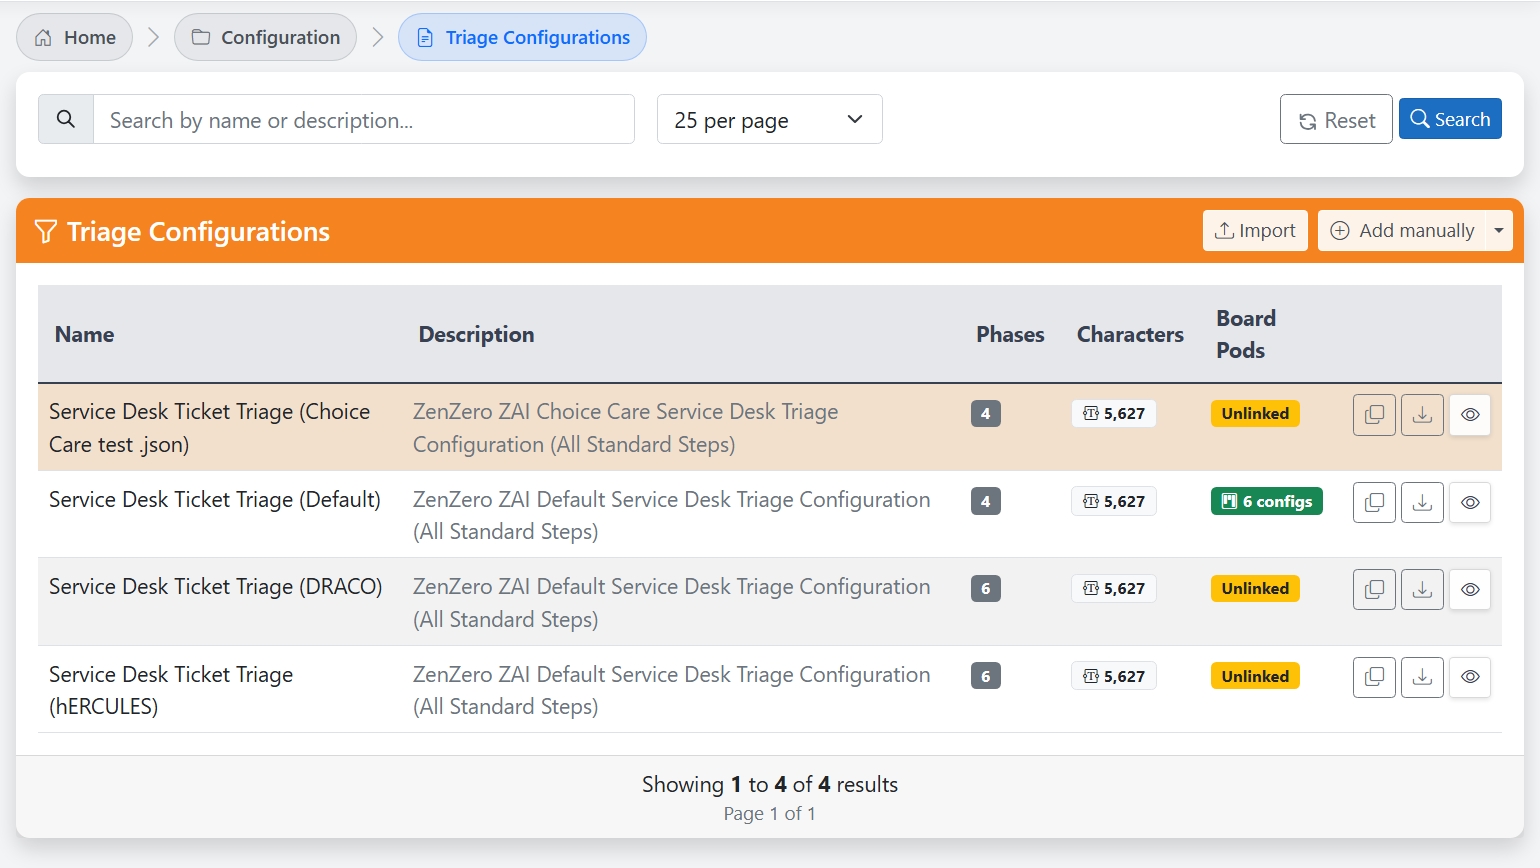 Screenshot: Triage Configuration Page
In the above image, it shows all of the triage configurations that have been made by other pods, there is also the default configuration. The default configuration is the baseline used by every pod, if the pod manager wishes to make their own triage configuration, they can make a copy of the default configuration settings and change it from there. By making a copy it allows the user to make changes to the config without having to worry about affecting other pods.
-
Direct Link - Triage Configurations Section
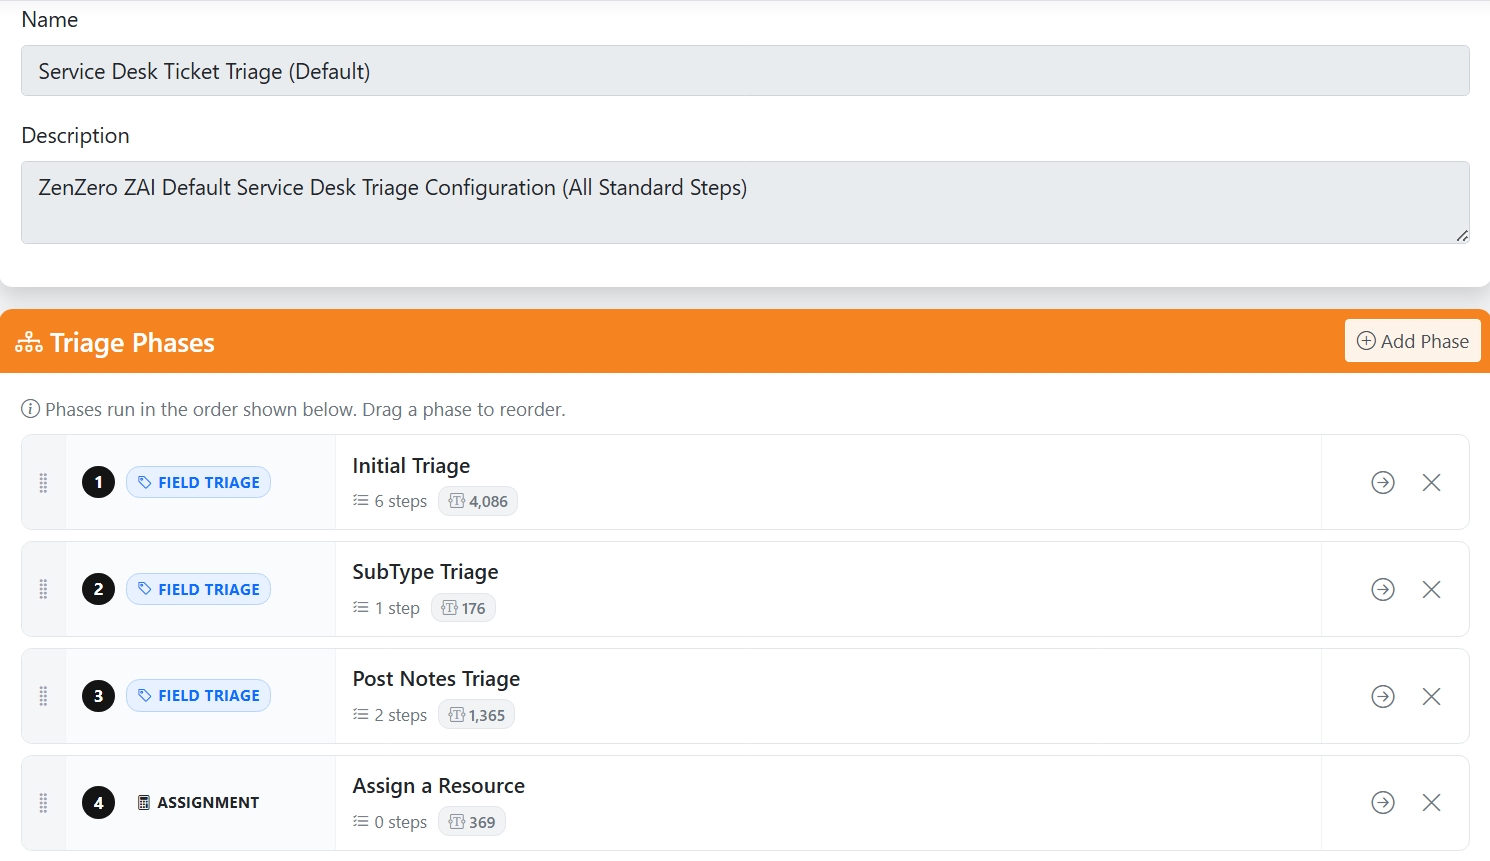 Screenshot: Default triage configuration view
Upon clicking the view button next to each of the triage configurations, it then takes you to the details and phases. Each of these phases defines the steps that zai takes to triage each ticket. Ill explain the following phases below:
Intial Triage
In the first phase there is 6 steps: classify ticket technical level, type, priority and add ticket tags, sentiment No., sentiment reason. Here, you can program exactly how you want each ticket to get triaged, its also easy to switch around what order you want the steps to be in allowing for personalized triage. Each of these steps has a further explanation on the zai page.
SubType Triage
In the second phase there is only 1 step, classify ticket subtype. You can easily add more steps to each phase if needed as this is just the default, meaning its the basic level of triage.
Post Notes Triage
In the third phase there is 2 steps: Post troubleshooting step notes and post suggested response note. These steps allow for quick responses to customers. this also increases customer response time meaning overall better ticket scoreing.
Assign a Resource
This final phase is the calculation. In this section you can create mock tickets to test your calculation on ticket data.
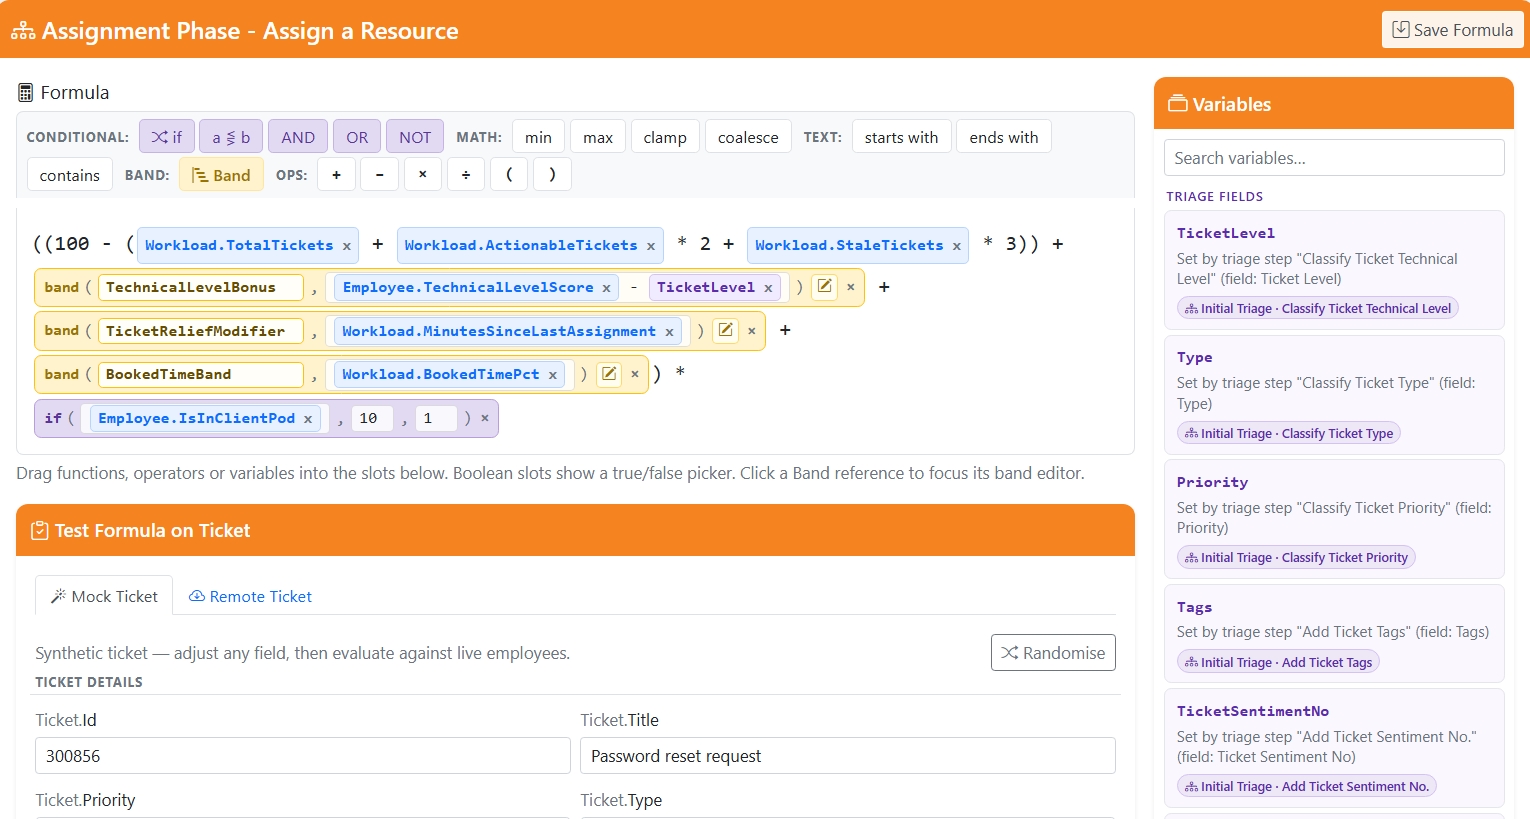 Screenshot: Triage Configuration Calcultion
There is multiple steps to the triage configuration, ill explain a few of the points below:
Triage Configuration Phase - This is a single LLM call
Triage Configuration Step - A triage configuration step is an LLM instruction, e.g. field assignment, note writing, that will be joined together and sent in a phase
Types of Configuration phases - There is three main phases: Triage field defines what Triage is predicting and on which ticket data, Triage notes controls how a prediction is delivered once made and Scoping defines the training data boundaries for the model — i.e., which historical tickets feed the index
Triage Equation - This defines the calculation run against available resources to determine the most suitable engineer to deal with the ticket.
Testing the Equation - Below the calculation, there is a section where you can make test tickets, this allows you to use real ticket data and from there test and personalize the calculations to your needs